World Map Generator Part 2 - Elevation Generation
Previous ||
Now that we've gone over the basic architecture of my Godot map generator project, it's time to get into the really fun stuff: the data manipulation and terrain generation itself.
The powerhouse of the cell heart of my terrain map generation is the GenerateNewWorld() method, which goes step by step through each piece of the process. Each step of terrain generation (elevation generation, temperature generation, and so on) has its own method. Because some of the generation processes are modulated by others, GenerateNewWorld()calls these sub-methods in a specific order and awaits their completion before moving on to the next one.
GenerateInitialTiles()— Populates thetilesarray with a set number ofTileDataobjects based on the tile resolution you've set. See the previous post for more info on how the tiles are set up.GenerateElevation()— Generates the elevation values and landmasses. <-- You are here!GenerateSeas()— Generates oceans based on the elevation and the chosen sea level.GenerateTemperatures()— Generates the temperature values based on latitude and elevation.GenerateHumidity()— Generates the humidity values based on proximity to water and elevation.GenerateBiomes()— Generates and smooths biomes based on a combination of every other variable.
Most of these specific generation methods are not too complex, but long enough that they probably deserve their own blog post. For this post, let's look at the variable that modulates nearly everything else in our little generated planet: elevation.
Sampling Noise in Godot
Before we dive into the details, let's take a step back and look at some of the basic components that we're working with. I've mentioned noise a few times over the course of this series, but haven't really gone into the details of how it works or how I'm using it here. This seems like as good a place as any to do so.
For references on Perlin noise in general and using noise to generate terrain, you can look at the Terrain Generation with Noise reference section of my introductory post in this series. This section is about applying some of those principles to Godot.
In Godot, you can generate and sample noise using the Noise base class and a FastNoiseLite Resource, which is powered by the open source FastNoise Lite library . You can choose from several different noise algorithms using the Godot implementation, and it also gives you several handy ways to adjust the output.
 |
|---|
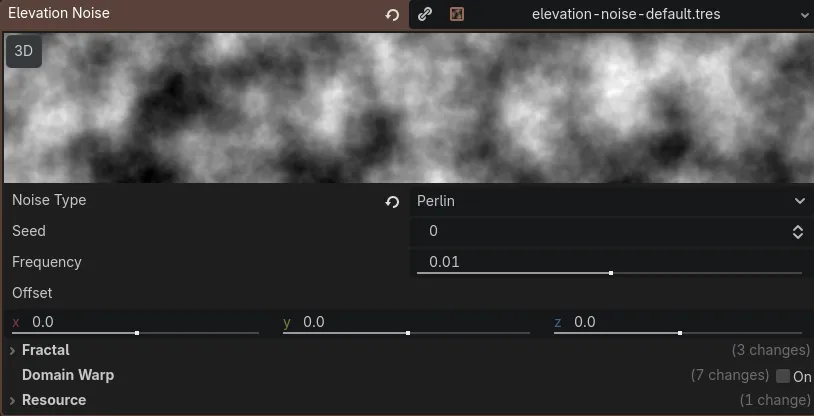
| An example of a FastNoiseLite resource in Godot. |
There's a lot to look at here, and it's fun to mess around with, but to keep things simple, we mostly need to know the following variables:
- Seed is the initial generation value. Changing the seed re-generates the noise.
- Frequency determines the resolution of the noise. Smaller values result in blobbier noise, and higher values make for more detailed noise. For me, adjusting the frequency feels like zooming in or out of the noise map.
- Noise Type determines the general shape of the noise. These are all specific algorithms that result in different characters of noise. Perlin (used here) tends to resemble natural shapes, with continuous gradations between regions. Cellular (another one of my favorites) looks like plant cells or city grids, depending on your settings.
This looks cool, but it's pretty useless unless you can get data out of it. That's where sampling comes in. Godot's Noise class has a range of sampling functions that take different inputs (like an int, vector, or float) and return a value between -1 and 1. You can think of it like selecting a pixel on the noise image, then returning how dark the pixel is. -1 means the pixel at that coordinate is completely black, and 1 means that it's completely white.
How is this useful? Well, in our case, we can feed a tile's coordinates to one of these sampling functions (for example, GetNoise2D() , which takes an X and a Y coordinate) and get the noise value for that coordinate. Then, we can map that value to a gradient, and get a nice visual representation of the noise.
For a highly simplified example (we'll get into a more detailed one later), you can sample the noise like this:
// GetNoise2D takes an X and a Y coordinate and returns a value between -1 and 1.
float noiseValue = NoiseGen.GetNoise2D(tile.x, tile.y);
...then create a Gradient that looks like this:
 |
|---|
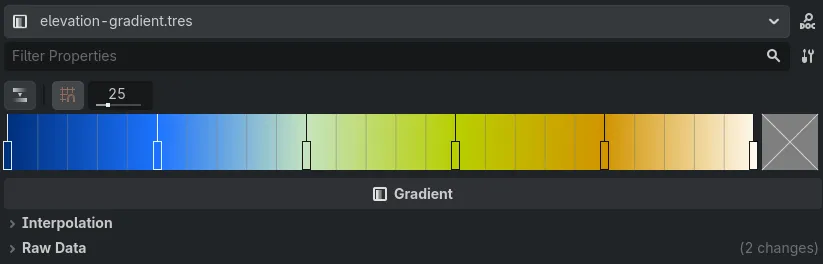
| The Gradient I used to color my elevation map. |
...then map the noise sample to a color value using the Gradient:
Color c = ElevationGradient.Sample(noiseValue);
When you do this for each tile, then draw it, you can get a visual representation of all of the noise values, like so:
 |
|---|
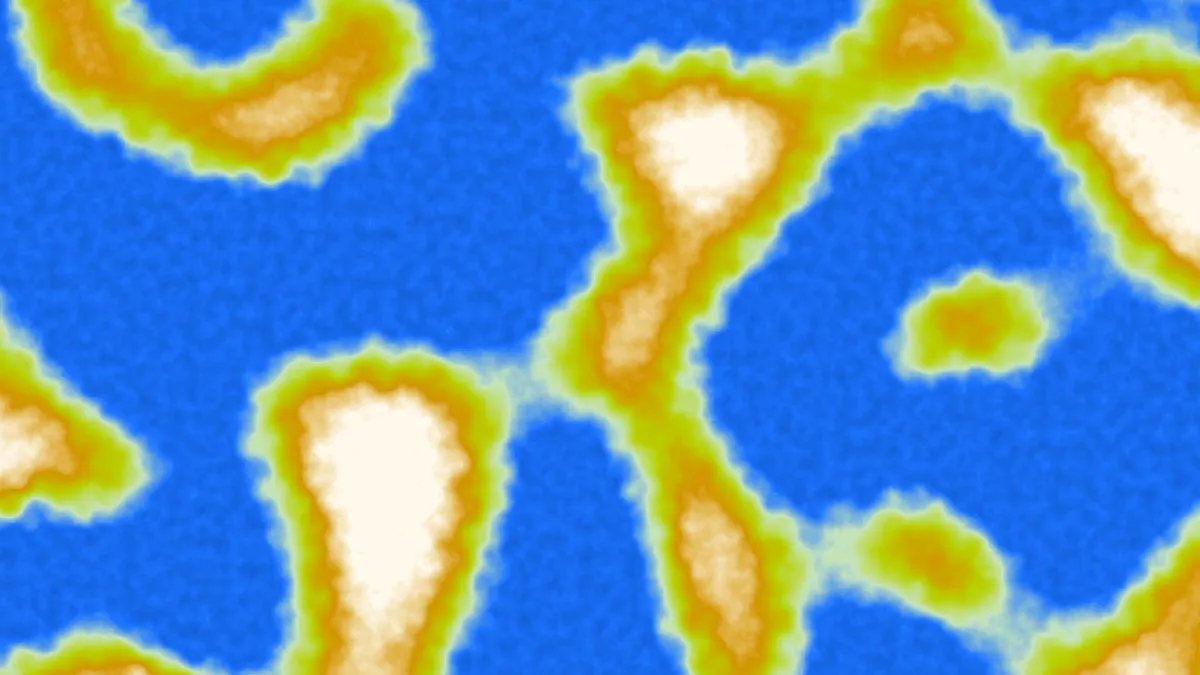
| Noise values mapped to different color values on a Gradient. |
In the real world, you have to mess with the values a bit to get them in a compatible format (for example, the noise sampling functions return a value between -1 and 1, while the Gradient sampling function returns a value between 0 and 1), but we'll get into the more specific details later in this post. For now, this is a decent illustration of the basic concept.
Fast(NoiseLite) and Loose Elevation
Because elevation isn't affected by any other variables, I thought that generating elevation would be the simplest step. All I had to do was create some noise, sample the noise at the coordinates of each tile, map the resulting noise value to a corresponding elevation value, and boom, I'd have elevation, terrain, and continents. Oh, how naive I was.
Turns out, if you just sample random noise, you get something that looks a lot like...well, random noise:
 |
|---|
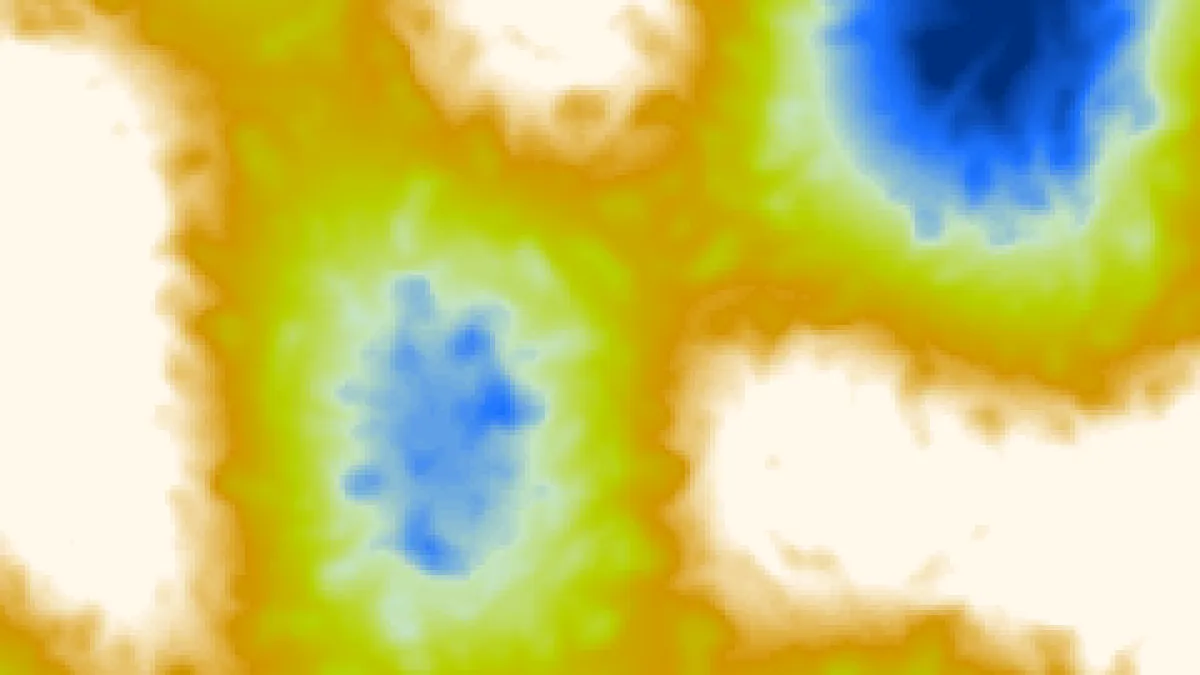
| Elevation map generated almost purely with random noise. It looks kinda decent, but definitely not natural or planet-like. |
Instead of flowing, natural terrain that mimics tectonic plates and well-defined regions, I got some ink blots. It wasn't all bad: the different elevations did have some flow to them (thanks, Perlin noise), and the lacunarity settings I'd used gave the elevations a tendril-y quality that at least evoked some kind of geophysical activity. But it wasn't ideal. Instead, I'd have to get a bit more granular.
Continents and Multiple Noise Sources
Initially, I tried tinkering around with the FastNoiseLite fractal and octave settings. These settings essentially run the noise function through a series of loops, with each loop modifying the result slightly.
INFO
I gained a much better understanding of octaves, fractals, and other common noise concepts like this by looking at the Understanding Some Basic Noise Terms section of the MARI Extension Pack documentation. Kudos to that writer for providing excellent general information on the subject that you don't need to use MARI to access.
Another great resource is Making Maps with Noise Functions by Amit Patel at Red Blob Games. They go over all sorts of tweaks and math maneuvers you can do to make your noise feel less noisy and more terrain-y.
However, these strategies didn't yield very useful results. They generated more detail in my noise, for sure, but none of the settings were able to capture the feeling of continents and large landmasses. I wanted large swaths of similar elevations, with distinct peaks, valleys, and other formations cropping up in discrete places, instead of willy-nilly at any point in the map.
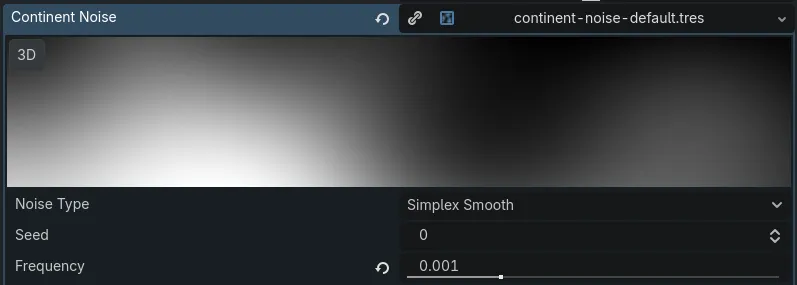
What ended up working was using not one, but two sources of noise to create continents. The first noise source, ContinentNoise, uses the Simplex Smooth noise type at a very low frequency to paint in broad strokes. This would create the big areas with similar values that I wanted for my continents.
 |
|---|
| Settings for the Continent Noise generator. Its Noise Type is set to Simplex Smooth, and its low frequency makes for large, fuzzy-looking swaths of similar values. |
After generating the continents using the ContinentNoise, I generated the elevation detail for the continents using a second noise generator, the aforementioned ElevationNoise. This took advantage of the fractals and octaves to create more detail in the continents. Then, I blended the two noise values together.
Molding Islands with Curves
The last step for elevation was to further customize the character of my landmass detail. I did this using Godot's Curve resource (which I used several times in this project), an extremely flexible method of creating relationships between two variables. You can pass an X value to a Curve and it returns the Y value that corresponds to it: this is sampling the Curve. It works in almost the exact same way as sampling a Gradient or a noise map, except a Curve can return whatever values you set.
For my continents, I wanted to create a Curve that would mimic a coastline and characterize the change in elevation as the island or continent rises from the sea floor. I created a steep increase at the middle of the value range to emulate this:
 |
|---|
| The Curve for my continental shelf. Lower values receive no adjustment, higher values are adjusted to the max, and mid-range values see a steep rise. |
Then, I sampled the curve using my ContinentNoise value. This did a great job of making the continents and/or islands (depending on the user settings) rise from the depths of the ocean in a convincing way.
The Result
That's pretty much it for the initial elevation generation! There are a few things to note in the final code that I glossed over in my descriptions above.
Sampling and Remapping
First, I mentioned in the Sampling Noise with Godot section that the real-world method of sampling a Gradient using a noise value is a bit more involved. This is because the FastNoiseLite sampling functions return a value between -1 and 1, where the Gradient.Sample() method takes a value between 0 and 1. If I just passed the returned noise value, the Gradient wouldn't work as expected.
The same issue arose throughout the project whenever I had to sample variables using other variables. My final humidity, temp, and elevation values were all between 0 and 100, for example, which meant those would also have to be modified in the final result.
The solution was Godot's extremely handy built-in Remap method (Mathf.Remap() in C#, or just remap() in GDScript), which converts one continuous range of numbers into another. Remap made all these conversions super-simple, and I used it extensively throughout the project.
Continent Bias
Lastly, I wanted to give my user more control over the shape of their planet, and whether it would have giant, Pangaea-style landmasses or a series of archipelagos. To do this, I added a ContinentBias variable into the mix and applied it to the continent Curve-sampling step. ContinentBias accepts a value between -1 and 1; negative values result in more ocean and island planets, while positive values result in bigger continents.
Final Elevation Generation Code
With all that out of the way, here's my final elevation generation method, warts and all:
public Task GenerateElevation()
    {
        GD.Print("Generating elevation...");

        try
        {
            if (ElevationNoise == null || ContinentNoise == null)
            {
                throw new NullReferenceException(
                    "One or more elevation noise generators couldn't be found! Cannot set elevations."
                );
            }

            // Randomize the seed.
            ElevationNoise.Seed = (int)GD.Randi();
            // Randomize the frequency within a range.
            ElevationNoise.Frequency = (float)GD.RandRange(0.005f, 0.01f);

            ContinentNoise.Seed = (int)GD.Randi();
            // Randomize the continent noise frequency, but keep it within a very small range.
            ContinentNoise.Frequency = (float)GD.RandRange(0.0003f, 0.001f);

            for (int i = 0; i < _tileNode.Tiles.Length; i++)
            {
                ref TileData tile = ref _tileNode.Tiles[i];
                Vector2I realCoords = _tileNode.RelativeToRealCoords(
                    tile.x,
                    tile.y,
                    TileResolution
                );

                // Sample the continent noise and remap it to [0, 1] so we can use it with the curve.
                float continent = Mathf.Remap(ContinentNoise.GetNoise2Dv(realCoords), -1, 1, 0, 1);

                // Apply the continent shelf shaping curve to the continent noise sample.
                // Add the ContinentBias in to give the user a little more control over the size of the continents.
                float continentShaped =
                    ContinentShelfCurve != null
                        ? ContinentShelfCurve.Sample(Mathf.Clamp(continent + ContinentBias, 0f, 1f))
                        : Mathf.Clamp(continent + ContinentBias, 0f, 1f);

                // Get the elevation noise at the tile coordinates and remap it.
                float detail = Mathf.Remap(ElevationNoise.GetNoise2Dv(realCoords), -1, 1, 0, 1);

                // Blend the two noise values with a weight assigned to each.
                float blended = (continentShaped * 0.85f) + (detail * 0.15f);

                // Convert the blended noise value to our property range (0-100)
                // and modulate it using the BaseElevation.
                float finalElevation = (blended * MAX_PROP_VALUE) + (BaseElevation - 50);

                // Clamp and assign the elevation.
                tile.elevation = (int)Math.Clamp(finalElevation, 0, MAX_PROP_VALUE);
            }

            return Task.CompletedTask;
        }
        catch (Exception e)
        {
            GD.PrintErr(e.Message);
            return Task.FromException(e);
        }
    }